


The Check Before the Cut: Mastering Upper Bridge Design in B4D

In digital dentistry, it is easy to let the software dictate the design. We click "generate" and hope for the best. But true mastery comes from understanding the geometry beneath the button. This workflow guide breaks down the upper bridge design process in BlenderforDental, demonstrating our core philosophy: control over automation. By learning how to repair meshes, adjust cutters, and weld connectors, you elevate your role from software operator to digital craftsman.

Workflow Education: BlenderforDental
The moment you import a scan for an upper bridge, you are faced with a choice. You can rely entirely on automated proposals and accept whatever the algorithm generates, or you can take control of the geometry. In BlenderforDental, we believe that technology should serve the clinician's vision, not the other way around.
This guide walks you through a comprehensive workflow for designing an upper bridge. We will cover everything from the initial model setup to the final smoothing of the bridge structure, ensuring that you maintain complete authority over margins, contacts, and structural integrity.
"The software is powerful, but your judgment is the most important tool in the workflow."
The Foundation: Setup and Preparation
Every successful design begins with proper object management. In B4D, this means clearly defining your working models and antagonists before any design work begins.
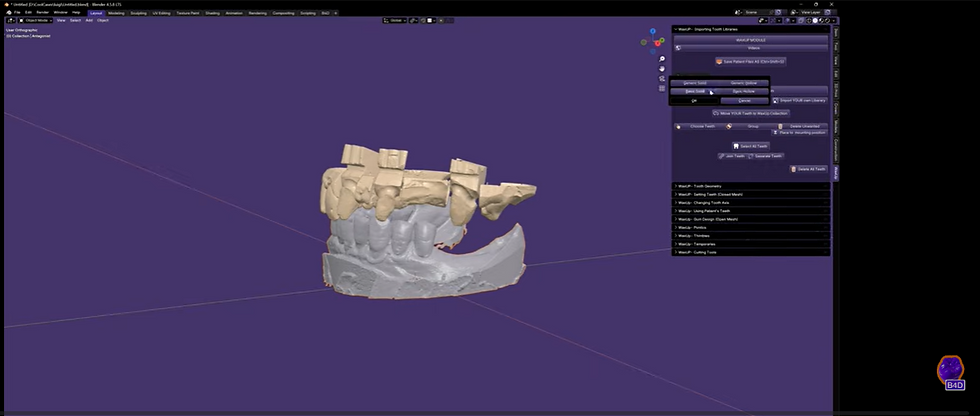
The first step is categorizing your meshes into Working Models, Antagonist, and Teeth collections. Once the models are defined, the teeth from the B4D library are imported and mounted. This initial positioning is crucial. It sets the stage for the entire restoration, allowing you to visualize the final outcome before a single margin is drawn.
"Precision at the setup stage prevents hours of troubleshooting later."
The Critical Boundary: Margin and Contact Design
The margin is where the digital world meets the biological reality. Drawing margins in B4D requires a deliberate, focused approach. You are not just tracing a line; you are defining the foundation of the restoration.
One of the most common challenges in digital design is dealing with damaged interproximal contacts on the scanned model. B4D provides the tools to repair these issues directly. By isolating the model, entering Edit Mode, and using the 'F' key to fuse the hole, you can recreate a viable contact point. This ensures that your restoration will have a solid foundation to build upon.


When painting the tissue contact areas and pontics, the angle of your view matters. Painting at an angled view ensures that the software generates a correctly shaped surface object, perfectly adapting the underside of the pontic to the tissue.
The Invisible Architecture: Block-out and Spacing
Before generating the crowns, the underlying architecture must be prepared. This involves surveying and blocking out the upper model to create a stable base for the bridge.

B4D's automated tools simplify this process by applying auto-die spacers and safety zones. These zones ensure that the final restoration will have the correct internal fit and adequate clearance for milling or printing. It is a perfect example of automation serving the designer's intent—handling the repetitive calculations while leaving the clinical decisions to you.
The Transformation: Generation and Trimming
This is the phase where individual elements become a unified restoration. But before clicking "Generate," a crucial manual check is required.
The tooth mesh must be pulled down closer to the margin line. Failing to do this can result in a crown that generates without the correct contour. Once the mesh is positioned, the crowns are generated, fusing the wax-up anatomy with the margin and safety zone data.
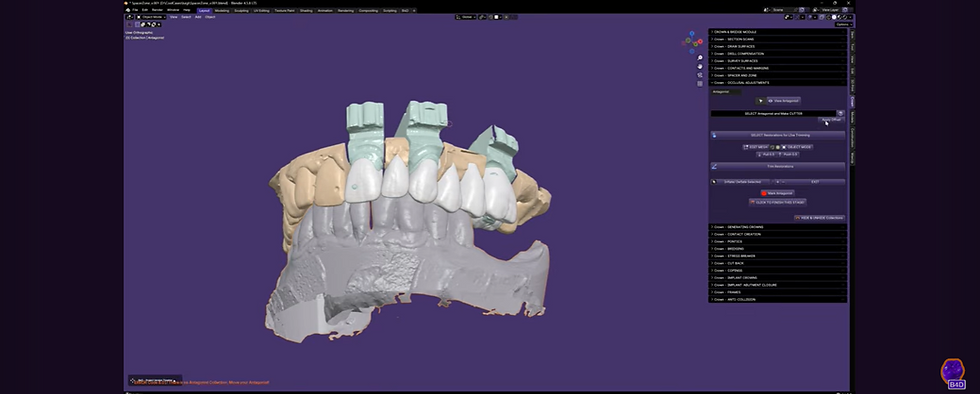

Occlusion is another area where human judgment is essential. If the generated crowns interfere with the opposing arch, B4D allows you to use the antagonist as a cutter. You can adjust the offset value, giving you precise control over the occlusal clearance.
"If there is a visual gap before unification, the software will leave an air gap. You must ensure the meshes physically touch."
When joining the individual teeth into a single bridge unit, you must prevent air gaps. By entering Edit Mode with Proportional Editing turned on, you can manually stretch the mesh so the teeth physically touch before unifying them. This guarantees a solid, continuous structure.
The Final Polish: Connectors and Finishing
A bridge is only as strong as its connectors. After unification, the connections between the teeth may be too thin for structural integrity. This is where the "Weld" tool becomes invaluable.

Think of the Weld tool as applying digital "liquid wax." You can duplicate and move this wax around to build up the joints, manually adding volume to the interproximal embrasures. This step ensures that the bridge will withstand the forces of occlusion.

Once the connectors are reinforced, the overall bridge is smoothed. Finally, the "Auto Contact Cutter" is used to generate a transparent cutting object based on the adjacent teeth. By ensuring this cutter fully extrudes through the contact area, you can create a perfectly flattened and shaped interproximal contact.


What's Next for Your Workflow?
Mastering the upper bridge design is just one step in reclaiming your digital workflow. As you become more comfortable with mesh manipulation, boolean cutters, and structural welding, you will find that there is no case too complex to handle.
BlenderforDental is continually evolving, with recent investments in AI coding and advanced segmentation tools, including Airways. These features are designed to enhance your capabilities, not replace your judgment.
Ready to Start Your Own Journey?
This workflow transformation begins with a single decision: to invest in BlenderforDental and embrace total design freedom. Whether you're a clinician frustrated by black-box automation or a designer seeking complete control over your workflows, B4D provides the tools to make the impossible possible.
Explore the modules that make this workflow possible:
• Crown & Bridge Module — Design single crowns, bridges, and complex restorations with complete control.
• Model Designer — Prepare your scans and create perfect working models.
• Wax-up Module — Access extensive tooth libraries and powerful positioning tools.
Join the B4D community and discover what's possible when you choose skill-first, human-led digital dentistry.
Related Articles & Learning Path
This workflow builds on foundational concepts covered in other B4D educational articles. To deepen your understanding and master the complete bridge design process, explore these related resources:
Mesh Literacy & Troubleshooting
Beyond STL: Leveraging Mesh Data for Superior Implant Outcomes — Learn how to inspect and work with underlying mesh geometry for superior clinical outcomes. This article teaches you to see what others hide in the data layer, a skill essential for bridge design.
The Quiet Check Before the Cut: How iBar 2.0 Mesh Analysis Helps Prevent Boolean Failures — Master mesh analysis to prevent structural failures before they happen. This complements the bridge workflow by showing you how to validate mesh integrity at every stage.
Occlusal Design & Harmony
Beyond the Perfect Scan: Engineering Occlusal Harmony — Understand the principles of occlusal design that ensure long-term restoration success. This article deepens the occlusion concepts introduced in the bridge workflow.
Human-Led Digital Dentistry Philosophy
The Human Element: Why Your Brain is Still the Most Important Tool — Explore the philosophy behind maintaining clinical judgment in digital workflows. This is the philosophical anchor for understanding why bridge design requires human oversight at every stage.
How to Validate AI Dental Designs Before You Trust Them: A Human-Led Checklist for Digital Dentistry — Learn the validation framework that ensures every design meets your clinical standards. This article teaches you to apply human judgment to any design proposal, including AI-generated bridges.
Beginner Pathways
The First Step: A Beginner's Guide to Digital Dentistry with B4D — If you are new to B4D, start here to build foundational confidence before tackling bridge design. This article provides the conceptual foundation that makes the bridge workflow easier to understand.
Ownership & Workflow Philosophy
The Hidden Cost of "Free" Updates: Why True Ownership is the Future of Digital Dentistry — Understand why B4D's buy-once-for-life model supports long-term clinical autonomy. This article explains the business philosophy that enables the technical freedom you exercise in this workflow.
-------------------------------------------------------------------------------------------------------------
Connect with the Community
• Instagram: @blenderfordental
• Facebook Group: Blender for Dental Community
• YouTube: Blenderfordental Tutorials
Share Your Story
Have you mastered a complex workflow in B4D? If you would like to be featured in an upcoming Community Voices story, we would love to hear from you. Reach out to us at marketing@blenderfordental.com.
Your journey deserves to be shared.
Editor's Credit
This article was edited and curated by Dr. Samira Alrefaey, Blog Editor & Marketing Specialist at BlenderforDental. Through educational workflows like this, we continue our mission to amplify the voices of clinicians and designers who are redefining what's possible in digital dentistry—one case, one breakthrough, one dream at a time.


Comments