


The Sandbox Where Digital Dentistry Begins: A Preview of the WaxUp Module

Every module we release at BlenderforDental answers a question clinicians keep asking. The WaxUp Module answers the first one: "Where do I even begin?"
What makes this particular session worth sharing is not the polish. It was a live Zoom walkthrough, unscripted, from a screen on the sunny Gold Coast, with a participant named Wolfgang nodding along at the mounting table and a software crash that was simply laughed off, restarted, and continued. That is the environment in which these tools are built and taught — honest, patient, and human.
The WaxUp Module is where every other workflow starts. It is the tool for anyone afraid to open Blender for the first time, because it demands no margins, no tolerances, no final-restoration pressure — only a tooth, a scan, and your judgment. It also rewards experts, because beneath the simplicity lies a diagnostic engine that feeds the Model Designer, the Splint Module, and the advanced crown and bridge workflows.
This article walks through what happened in that session — and why it matters to you, whether you are a clinician guarding your control, a designer drowning in fragmented software, or a beginner who has never touched 3D design in a dental context.
— Dr. Samira Alrefaey
Blog Editor & Marketing Specialist | BlenderforDental

There is a moment in every long career in dentistry when you realize the wax-up was never really about wax. It was about thinking out loud in three dimensions — deciding, before anything is cut or printed, what the teeth ought to be. The analog wax-up taught generations of clinicians to see the end result before committing to the process. And then, somewhere along the way, digital dentistry nearly lost that habit, replacing it with automated outputs that do the thinking for you.
The session we are about to walk through was a deliberate act of giving that habit back. Across roughly an hour of shared screen, we watched a complete digital wax-up come together — tooth library to mounted arch, socket model to sculpted gum, heat map to print-ready try-in. No magic. No black box. Just a thinking tool being used by someone who knows exactly what his hands are doing.
"We want the users to be able to create their own tooth library..so as we're cutting teeth off, we can save the teeth for somebody else. So we've got a donor in some way."
That sentence, spoken mid-session while extracting a tooth from a scan, quietly contains the entire philosophy of the module: nothing is disposable, everything you build can become the next person's starting point, and the knowledge stays in your hands, not behind someone else's subscription wall.
The Spark: Why Everything Begins with a Wax-Up

Ask any seasoned clinician or technician how they approach a full-mouth rehabilitation, a smile design, or an immediate denture, and the answer eventually circles back to the same ritual: build the ideal first. Decide what success looks like before you decide how to manufacture it.
That is exactly the problem the WaxUp Module was built around. In the digital world, the wax-up used to mean exporting to another platform, waiting for an automated proposal, and negotiating with software logic you could not see. B4D chose a different path: put the same freedom inside Blender, where the clinician is the one moving the tooth, rotating the axis, and deciding what symmetry actually means for this patient.
The module positions itself deliberately as an intermediate — the ground between the tooth and the restoration, between the Model Designer and the Splint Module, between diagnostics and production. And that is precisely what makes it the best place to start your BlenderforDental journey.
The Session: Teeth in Your Hands, Not in a Queue
The session opened mid-thought, with arches already loaded into the Blender workspace. The first lesson was deceptively simple — grouping.
Teeth were organized into upper and lower groups, selectable in a single click. The reason given was practical and memorable:
"This is quite important because sometimes you may want to separate the lower arch from the upper arch when you got a full mouth rehab. So this is quite a good thing that we need to do."
From there, the workflow moved the way a skilled clinician moves — deleting unwanted teeth, pulling the rest from the library, and placing them with the G and R keys, Blender's native move and rotate shortcuts. Nothing was hidden behind a menu. The hands stayed on the keys; the mind stayed on the case.
The Mounting Table: A Snap of Confidence
For beginners, this was the first real exhale of the session. Placing teeth by eye is intimidating — the occlusal plane does not forgive. The Mounting Table feature changes that conversation entirely. A tooth dragged toward the table simply snaps into position against the mounting plate, giving an immediate, anatomically sensible starting point.
As one voice put it during the demo:
"I do see the logic of the mounting table, so that you can get that snap-on effect to where you want it."
It may not be one hundred percent final — the session was candid about that — but it is close enough to stop second-guessing and start refining. That is a teaching decision as much as a software decision: give the beginner confidence, then hand them the precision tools.
Mirroring and Axis: Symmetry Is a Decision, Not a Coincidence
The second act of the session dealt with the thing analog wax-ups could never guarantee — perfect, measurable symmetry. Using the axis tool, a tooth was selected, a guide was placed over it, rotated through multiple views, and accepted with a Shift-click, the tooth changing color to confirm the new axis. The use case was stated plainly: for moments when you want "real precise angles, like orthodontics."
Then came the Mirror Coordinates function. With two front teeth selected, one tooth adopted the exact angulation of the other — "it is now put in the exact correct angle as to the other one." Not approximately. Exactly.
For orthodontic planning and smile design, this single step replaces an entire afternoon of eyeballing. And it is worth pausing on what that means philosophically: symmetry stops being something you hope the software guessed correctly, and becomes something you declared.
Donor Teeth and the Socket Model: Planning the Extraction Before It Happens
Perhaps the most forward-thinking moment of the session was the Copy Tooth demonstration. A tooth was outlined on a scan and extracted into a personal library — a donor tooth that can serve the next case, the next patient, the next clinician.
Immediately after came the Socket Model feature: a clean extraction socket generated in the gum line, ready for planning an immediate denture. Think about the clinical picture this creates — a patient facing extraction can see, before the appointment, what their arch will look like the same day. That is not a rendering. That is a conversation, held in three dimensions.
Using the mirrored donor tooth, the demo then showed how quickly a temporary bridge takes shape — copy, mirror, position, done. The temporary bridge that used to mean an extra lab remount became a ten-minute design exercise.
Design Philosophy: The Face Sets the Smile
The most striking sequence in the entire session was the smile design built on a 3D facial scan — captured, notably, with a Medit scanner whose colors were praised for their biological realism. The face was aligned with the lower model, the generic library teeth placed into the upper arch, and the smile designed against the patient's own face, not against a template's idea of a smile.

This is the moment the philosophy becomes visible. Most software asks: what do our presets allow? The WaxUp Module asks: what does this patient need? The clinician remains the author; the software remains the pen.
And when the design needed refinement, the session turned to Blender's sculpting brushes — a moment accompanied by a smile in the voice:
"For those of you that don't know, Blender has absolutely amazing sculpting brushes.
The Heat Map: Trust, Verified
Every digital workflow eventually meets the same question: "But will it actually print?" The WaxUp Module answers it visually, before you waste resin and time.
The Heat Map reads thickness across the entire design — red at zero millimeters, warning of dangerously thin areas, transitioning to blue at one millimeter of safe bulk. In the demo, the canines flashed red. The response was immediate and instructive: switch to Blender's Sculpt mode, pull the mesh outward with the draw brush, and watch the red retreat until the whole arch sits safely in blue.

This is the heart of the buy-once-own-for-life, skill-first argument. No automated "thickness fix" quietly decided for you. You saw the problem, understood why it was a problem, and fixed it with your own hands. The result is a wax-up you would bet a printer run on — because you know exactly how it became printable.
From Design to Try-In
The workflow closed the loop into the physical world. The teeth were grouped, unified with Voxel Remesh into a single solid object, and cut against the preparation model with a Boolean operation — producing a try-in ready to print and seat. Temporary shells followed the same path: join the wax-up to the model, then use the Splint Module to cover the arch and fabricate.
When the session briefly crashed mid-demonstration, around the eighteen-minute mark, the response was a laugh, a file reload, and a calm return to teaching. That, too, is a feature. Real tools, used by real people, in real sessions.
What the WaxUp Module Is — and What It Is Not

The most important thirty seconds of the hour came during Q&A, when a participant asked about fitting teeth directly to abutments. The answer was given without hesitation:
"This is a diagnostic wax-up tool. It's not a crown and bridge module."
Clarity like this is rare, and it deserves to be understood properly. The WaxUp Module is the thinking stage — diagnostics, temporaries, extractions, smile design, denture setups, and try-ins. Final restorations fitted to abutments and margins belong to the dedicated Crown and Bridge Module, which takes your wax-up and uses it as the target model, merging it with the margin of the prepared die.
Stage | Tool | What It Handles |
Think & design | WaxUp Module | Tooth placement, axis, mirroring, smile design, sockets, gums, heat map, sculpting, try-ins |
Produce | Splint Module | Temporary shells and crowns, denture bases from the wax-up |
Fit | Crown & Bridge Module | Final restorations, margins, abutment integration |
Build | Model Designer | Printable bases, plates, and supporting structures |
The architecture is modular by design, and the WaxUp Module sits at the center of it. As the session put it, the upcoming Denture Module will be "very small" — because so much of denture design is already handled inside the wax-up. Learn this module once, and you are not learning a feature. You are learning the foundation everything else is built on.
The Orthodontic Template: You Are Never Working by Eye Alone
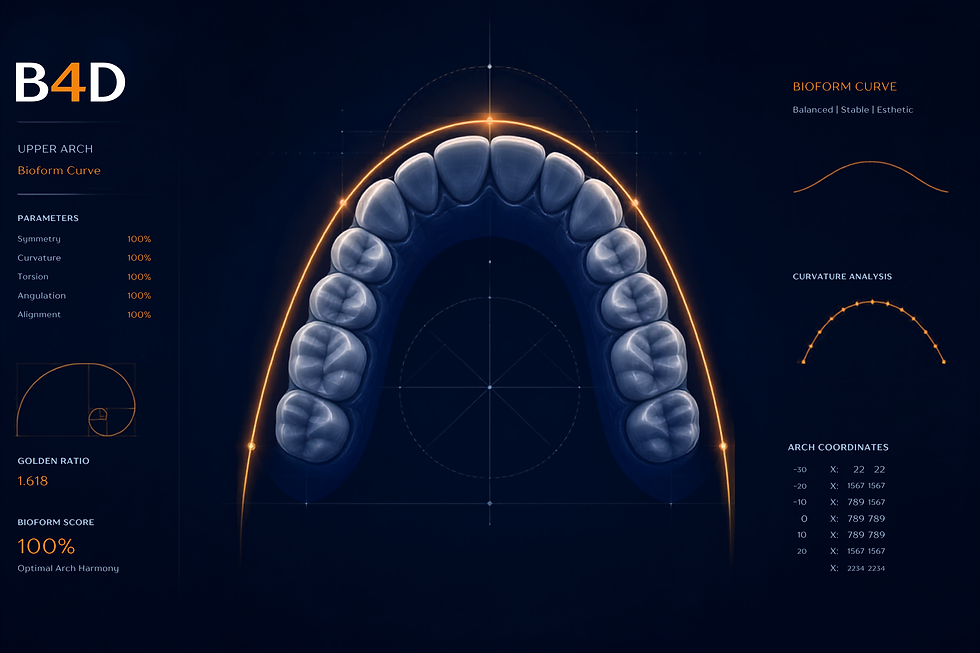
The final demonstration answered a question about the Curve of Spee, and in doing so revealed one of the module's most quietly powerful assets: 2D orthodontic templates — including Bioform and Trueform curves.
The template is scaled to the patient's arch and placed beneath the teeth. Individual teeth are then drawn down to the curve — separating, moving with the grab tool, joining back — until the whole arch sits on the line.
"You're not just working by eye, but you've actually got a template that you're using to work with."

For a patient with "really maloccluded teeth" facing veneers or a complete smile redesign, this converts the most subjective part of design — the curve of the arch — into something measurable, repeatable, and defensible in a consultation.
And while the session stayed focused on fundamentals, it closed with a tease of what is coming: dedicated smile design content, and a growing library of B4D's own AI-assisted segmentation tools — including Airways — that keep the intelligence inside the software under your control rather than replacing your judgment with it.
A Message to the Community
If you watched any part of that session and thought "I could never do that," we would ask you to look at it again — this time noticing how often the answer was already in your hands.
The mounting table removes the fear of placing teeth wrong. Mirroring removes the fear of asymmetry. The heat map removes the fear of a failed print. The templates remove the fear of working by eye. Every one of these tools exists for the same reason: to make you feel more capable, not more dependent.
"You're not just working by eye — you've actually got a template you're using to work with."
Start with the wax-up. Build one tooth. Mirror it. Sculpt it until the red disappears. Print the try-in and seat it. That single loop, repeated, is the foundation of everything else in this ecosystem — and no other path teaches you why digital dentistry works the way it does.
Ready to Start Your Own Journey?
The session that inspired this article was, in the presenter's own words, "a preview of what can be achieved." Everything you saw — the tooth library, the mounting table, the mirror coordinates, the heat map, the socket model — lives inside the WaxUp Module, a one-time purchase you own for life, with no subscriptions and no recurring fees.
Explore the modules from the session:
• WaxUp Module — Tooth libraries, mounting tables, mirroring, axis tools, socket models, gum creation, heat mapping, and sculpting for diagnostic wax-ups, try-ins, temporaries, and smile design.
• Splint Module — Fabricate temporary shells, crowns, and denture bases directly from your wax-up designs.
• Model Designer — Build printable plates, bases, and supporting structures around your designs.
• B4D Segmentation & Airways — B4D's own AI-coded segmentation tools that prepare your scans for any workflow, keeping you in control of the analysis.
Whether you are a clinician wary of black-box automation, a designer seeking one coherent workspace, or a beginner who simply needs a safe place to start — the WaxUp Module is that place. Learn the thinking stage, and every advanced workflow that follows will make sense.
Watch the Full Session
The complete, unedited walkthrough — including the Q&A on crown and bridge integration and the orthodontic template demonstration — is available on YouTube:
Share Your Story
Inspired by what you saw in this session? If you are using the WaxUp Module in your own practice or lab — whether for try-ins, immediate dentures, or smile design — we would love to hear from you. Reach out to us at marketing@blenderfordental.com.
Your workflow deserves to be shared.
Editor's Credit
This article was edited and curated by Dr. Samira Alrefaey, Blog Editor & Marketing Specialist at BlenderforDental. Through this session preview, we continue our mission to show clinicians and designers not just what our tools can do, but how to think with them — one tooth, one wax-up, one decision at a time.
About Blender for Dental
BlenderforDental (B4D) is the leading platform for human-led digital dentistry, providing clinicians and designers with complete control over their digital workflows. From diagnostic wax-ups to full-arch restorations, B4D empowers professionals to design what patients need, not what software dictates. Buy once, own for life. Learn more at blenderfordental.com.


Comments